Pages

Saturday, July 20, 2013

"You Are So Tweet!" Card

This week I made a card for the challenges over at the Krafty Girls blog and the Fantabulous Cricut Challenge blog. The challenge at Krafty Girls this week is "Birds of a Feather" Challenge #21 and the challenge at the Fantabulous Cricut Challenge blog is "Set the Scene" Challenge # 169. I combined these challenges and made this card:


I used light blue cardstock for the card base to look like the sky. The grass, tree, bird, and cloud were all cut from the Create a Critter 2 Cricut cartridge. The phrase "You are so Tweet!" was cut using the the Loop Dee Loo font from the Lyrical Letters Cricut cartridge. 

Supplies:
Light Blue Cardstock (Card Base)
Green Cardstock (Grass and Tree)
Brown Cardstock (Tree Trunk)
White Cardstock (Cloud)
Red Cardstock (Bird)
Black Cardstock (Bird)
Yellow Cardstock (Bird)
Create a Critter 2 Cricut Cartridge
Lyrical Letters Cricut Cartridge
Scotch Scrapbooker's Glue
Foam Squares
White Gelly Roll Pen

Measurements:
Card Base- 4 1/4 inches X 5 1/2 inches
Tree- 3 1/2 inches
Bird- 2 inches
Cloud- 2 inches
Phrase- 1 inch
Grass- 1 inch X 5 1/2 inches
(I welded the grass together to make it 5 1/2 inches.)


I hope that you like and can use this card idea.
Thanks for visiting &
Happy Crafting!

Friday, July 12, 2013

Birthday Card for My Niece

Hi Crafters! So I have finished all the birthday cards for this week. The last card I had to make was for my niece that is turning one. My niece has a little stuff monkey that she takes everywhere and every time I see her or pictures of her she always has the monkey or is wearing an outfit with a monkey on it. Therefore I had to make her a card with a monkey and I found the monkey on the Create a Critter 2 Cricut Cartridge.
 Here is a picture of her birthday card:

And here is a picture of the inside:
I used pink and purple to girl it up and then added the number one to the monkey's hat and shirt. I also used some stitching to give the card a little more detail. 

Supplies & Recipe:
-Pink Cardstock (Card Base: 8 1/2 X 5 1/2 Scored @ 4 1/4)
-Studio G Pink Paper Pack (Pattern Paper Layer: 4 X 5 1/4)
-Black Cardstock (Monkey Base: 3)
-Light Brown Cardstock (Monkey Middle Layer: 3)
-Dark Brown Cardstock (Monkey Top Layer: 3)
-Dark Pink Cardstock (Monkey's Hat & Shirt, Candles & Wave on Cake, "Make a Wish" Sentiment: 1 1/4, & "Happy Birthday" Sentiment: 2)
-Light Purple Cardstock (Ball on Monkey's Hat, The Number 1 on Shirt & Hat, Cake Plate: 1, Cake Icing, Phrase Bubble: 2)
-Yellow Cardstock (Cake Base: 1 1/2)
-White Gelly Roll Pen 
-Tape Runner
-Scotch Scrapbooker's Glue

Added Bonus: This week over at Krafty Girls the challenge is die cut. So I will also be entering this card into the Krafty Girls challenge this week. 

I hope that you like and can use this card idea.
Thanks for visiting &
Happy Crafting!


Thursday, July 11, 2013

A Birthday Card for a Teenager

Hey crafty friends! In my last post I talked about how this is a busy birthday week for me. I have two nephews and one niece and all of their birthdays are this week. One of my nephews will be turning 15 so I wanted to make a card that was more grown up looking and not so cutesy. Here is a picture of the card:
 And here is a picture of the inside of the card:
I really love the way this card turned out. I think it is great for a teenage boy and could easily be used for a teenage girl by just changing the color of the papers.

Supplies & Recipe:
  • Gray Cardstock (Card Base: 8 1/2 X 5 1/2 Scored @ 4 1/4, Banner Outline: 2 1/4 X 5 3/8, & Gray Circle: 2 1/2)
  • Studio G Blue Paper Pack-VPP0001 (Layer on Card Base: 4 1/8 X 5 3/8, Polka Dot Banner: 2 1/8  5 3/8, & The Number 15 cut from Cricut Craftroom Basics: 1 3/4)
  • Colorbok Designer Paper-Natural Expressions (Pattern Circle: 2 1/4 & Banner for Sentiment: 1 X 3)
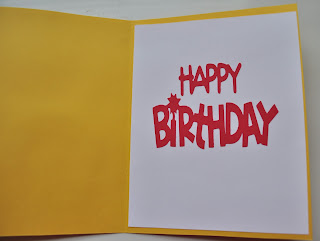
  • Dark Blue Cardstock (Scallop Circle cut from Cricut Craftroom Basics: 2 3/4 & "Happy Birthday" Inside the Card cut from Create a Critter 2 Cricut Cartridge: 2)
  • White Cardstock (Layer Inside the Card: 4 1/8 X 5 3/8)
  • Studio G Clear Stamps-VS4911 ("Celebrate" Stamp)
  • Tape Runner
  • Scotch Scrapbooker's Glue
I hope that you like and can use this card idea.
Thanks for visiting &
Happy Crafting!

Sunday, July 7, 2013

Create a Critter 2 Birthday Card

Next week is going to be a busy week of birthday card making. I have two nephews and one niece and all of their birthdays are next week. I just can't bring myself to buy a card now that I have entered the world of card making. I have already made one of the cards because one nephew lives in another state and his birthday is Wednesday. Therefore I need to mail it tomorrow. He is turning 6 so I did a cute lion card for him using the Create a Critter 2 Cricut cartridge.


Recipe for Card:
The card base is 8.5 X 5.5 and scored at 4.25. The pattern paper on the front of the card and white paper on the inside of the card are cut at 4 X 5.25. The lion and phrases were cut from the Create a Critter 2 Cricut cartridge. The lion was cut at 3 inches and the "Party Time" and "Happy Birthday" phrases were both cut at 2 inches.

Supplies:
Yellow Cardstock
Red Cardstock
Orange Cardstock
Brown Cardstock
White Cardstock
Pattern Paper (Recollections: The Bright and Basic Pad)
Tape Runner
Scotch Scrapbooker's Glue

I hope that you like and can use this card idea.
Thanks for visiting &
Happy Crafting!

Saturday, July 6, 2013

Owl Rosette

Lately I have been into card making but I love to do all kinds of crafts. So this week I decided to make more than just cards. I am not only a crafter but I am also a first grade teacher so with the summer half way over I have been wanting to make some things for my classroom. Last year I decided to do a theme in my classroom. I went with a polka dot and owl theme. So this week I made an owl rosette to hang in my classroom next year.

I love the way it turned out and can't wait to make more of them to hang around my classroom.
Recipe for Owl Rosette:
To make the rosette I cut a piece of 12 X 12 scrapbook paper into three strips that were 4 X 12. I then made score marks every 1/2 inch along all three pieces and folded the three pieces in and out like making a fan. Next I glued the three strips together making a circle. I then pushed the circle together and hot glued it in the middle. This week over at the Krafty Girls Challenge Blog the challenge was to use the color mint in your paper crafting project. Therefore I decided to use the colors mint, purple, and pink for the center decorative piece. I cut the mint scallop circle at 3 inches and the purple circle at 2.5 inches using Cricut Craftroom Basics. The owl was cut at 2 inches from the Create a Critter 2 Cricut Cartridge using the colors pink (body), mint (wings, ears, & belly), white (eyes), yellow (feet & beak), and black (pupil of eyes).
Supplies:
12 X 12 Sheet of Scrapbook Paper (Studio G:VPP0401)
Mint Green Cardstock
Purple Cardstock
Pink Cardstock
White Cardstock
Yellow Cardstock
Black Cardstock
Score Tool
Hot Glue Gun
Scotch Scrapbooker's Glue

Here are a couple more pictures of the owl rosette:

I hope you like and can use this idea in your own crafting. 
Thanks for visiting &
Happy Crafting!
-Mary

Happy 4th of July

Hello crafters! I hope that everyone had a wonderful 4th of July. For the fourth my husband and I spent time with family and of course I did some crafting. I made another 4th of July card. I used the Carson's Creations Sketch #18 which is the "You're a Star" Sketch. This is my first time to use a sketch while making a card and I have to say I love it. I have already created a board on my Pinterest page for card sketches and have started pinning some great sketches. You can click here to see and follow the board. I also used the colors red, white, and blue since this is a patriotic card.
Recipe for the Card:
The card base measures 8.5 X 5.5 and scored at 4.25. The white layer measures 4 X 5.25 and the red layer measures 3.75 X 5. For this card I cut three stars from Cricut Craftroom Basics. The blue star was cut at 3 inches, the white star was cut at 2.5 inches, and the red star was cut at 2 inches. The blue layer behind the stripes were both cut at .75 and the star pattern stripes were both cut at .5. The phrase was cut from the Create a Critter 2 cartridge and was cut at 1.5 inches. The frame around the phrase was cut from the Lyrical Letters Cricut cartridge and was cut at 2.75 inches. 
Sketch Used:
Supplies:
Blue Cardstock
White Cardstock
Red Cardstock (Colorbok Textured Cardstock: Natural Wonder)
Star Pattern Paper (Studio G: VPP0001)
Cricut Craftroom Basics (Stars)
Lyrical Letter Cricut Cartridge (Frame around phrase)
Create a Critter 2 Cricut Cartridge (Phrase)
Tape Runner
Scotch Scrapbooker's Glue
Foam Squares

Challenges:


I hope you like and can use this card idea.
Thanks for visiting &
Happy Crafting!
-Mary